ASSIGNMENT 1 EXPERIMENTATION WITH APERTURE
A couple of days ago I was given the task to experiment with different apertures to see the change in depth of field. In these first images I have used the same composition/ objects and changed the aperture each time. This task has allowed me to become a lot more familiar with the effect of aperture in the way we view an image. Whilst taking these images I have put the camera on the table right next to the first candle, therefore the textural qualities of the wooden table fades more and more at the back of the composition as I increase the aperture.

f/18
1/60 sec
This image has the largest depth of field, everything in the image is in focus. I have chosen to line up 4 identical candles in order to get an idea of the components distance from the camera itself, therefore showing the apertures result more vividly.
f/11
1/60 sec
In this second image the black chair at the back has faded slightly. We naturally turn our gaze to the front candle.
f/8
1/60 sec
f/5.6
1/60 sec
It is now quite unclear what is at the back of the composition.
I also tried changing the aperture with an object I was shooting outside. I used a rope in the image, part of this rope is very close to the lens of my camera and then it gradually goes towards the back of the composition. This illiterates the change of depth of field when increasing/ decreasing the aperture.
f/25
1/60
Here, everything is at the same degree of focus. The rope itself is a lot more textural than the images to follow, we get a lot more detail with a larger depth of field. The smaller the aperture I used the more in focus.
f/16
1/60 sec
The rope is starting to fade as it gets nearer to the camera.
f/10
1/60 secs
f/4
1/60 sec
In this image the rope near to the camera is blurred however the components towards the back of the image are in focus. The rope in this image makes us gaze our view towards the background because of the directional line.
In this aperture experiment I have lined up 3 eggs to get the full extent of change. The only fault I can find with these images is the light difference in each, due to me having to change the amount of light being let into the camera with a smaller/ larger hole being used.
In this image we can see the change by looking at the cushion to the back of the composition.
In these two examples of my experiments I have chosen 4 images in a sequence, going less focused at the back of the images in each. I chose objects that contain components in a row to get the full extent of change in depth of field.
ASSIGNMENT 2 FOREGROUND AND BACKGROUND
In the following images I used the aperture of f/ 22 in order to gain an image that is fully focused in all areas, with a large depth of field.
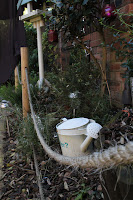
This is the same composition I have used for an image for assignment 3. There are sticks close to the camera and a fence containing a water feature at the back. They are all fully focused. I had to change the light because I had a lot larger hole for the aperture to achieve a large depth of field.
In this image I have used a gate in the front with a plant and the rest of the garden at the back of the photo to get the full effect of large depth of fields.
ASSIGNMENT 3 FOREGROUND VS BACKGROUND
In the left image the foreground is in focus, detail is clear on the flower, whereas outside the window is blurred. There is quite a lot of light on the flower which helps the perspective given.
In this image it is the same perspective of the flower however outside the window this time is in focus and the flower isn't. There is less light on the flower in this image also.
In this image the bracelet is fully focus, whereas the white cupboard at the back of the composition is blurred it is unclear what it is behind the bracelets.
Whereas in this image the cupboard is in focus and the bracelets are slightly blurred. We however can still tell what the bracelets actually are because of the obvious shapes.
For this image I used a table with grids on it so that I could really emphasise the effects. In the top image it is focused on the ground which is through the table.
ASSIGNMENT 4 SHALLOW
In the next images I used different aperture to focus on different pencils in the row, giving an idea of preference in the images.
This focuses on the table edge and the middle pencil.
The back pencil is our main point of focus in this image.
The first two pencils in the row are in focus, I have moved the camera away from the pencils slightly.
In this image the back of the centre of all the pencils are in focus, this gives us an idea of length.
In this image the middle pencil is in focus whereas the surrounding pencils are blurred. The background is also blurred, it makes this in focus pencil important in the image as it is the only detailed infomation we get by using a large aperture.
I used a curtain in this image to focus on different parts of the length of the curtain and its pattern.
I really like this way of working if the objects I am photographing are in a sort of row or column, it makes one particular still life stand out from the rest, as if that particular one/ couple has importance over the rest.
(Research can be found in sketchbooks)
(Research can be found in sketchbooks)


